
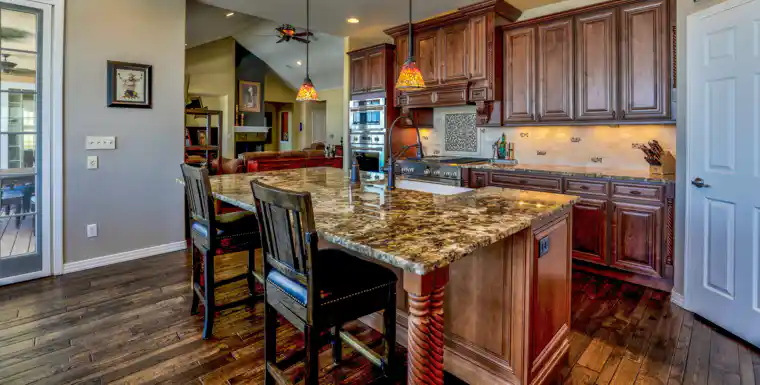
Imagine sipping your morning coffee in a kitchen that reflects your style and personality without the staggering costs of a full renovation. Sounds too good to be true? Not with cabinet refacing, a cost-effective and transformative solution to revamping your kitchen. Let's unfold the reasons that make cabinet refacing a smart choice for homeowners.
Quick Links
Brief Overview of Cabinet Refacing Benefits
In the hustle and bustle of everyday life, your kitchen inevitably experiences wear and tear. Cabinets start to show signs of aging, perhaps looking a bit dreary, making your whole kitchen feel outdated. That's where cabinet refacing steps in as a savior, giving your kitchen a facelift while retaining the existing structure.
It's also a fact that kitchen renovations can significantly enhance the overall value of a property. The good news is that with cabinet refacing, you don't have to invest in a full renovation to reap the rewards. Cabinet refacing stands as a budget-friendly yet highly effective way to boost your home's appeal and market value. According to the 2023 Cost vs. Value Report, kitchen projects like cabinet refacing offer an excellent return on investment (ROI), making it a savvy choice for homeowners looking to update their space without breaking the bank.
Enhancing Kitchen Aesthetics While Saving Money
Imagine walking into a kitchen that echoes elegance and modernity, all achieved without breaking the bank. Cabinet refacing not only bestows a fresh, aesthetic appeal to your kitchen but also fosters considerable savings. Yes, you can finally achieve that magazine-worthy kitchen without a grand expenditure!
Moreover, it allows for personalization. Your kitchen gets to wear your style, reflecting your tastes and preferences, making the space truly yours. You might opt for a rustic charm with warm wooden tones or a sleek modern look with high-gloss finishes—the possibilities are endless.
Alright, we have established the 'why'. Now, let's move onto 'how' to plan this rewarding project seamlessly.
Planning Your Cabinet Refacing Project

Proper planning is the cornerstone of any successful DIY project. It paves the way for smooth execution and averts potential roadblocks. Cabinet refacing, though less daunting than a full renovation, requires a well-thought-out plan to ensure a satisfying outcome.
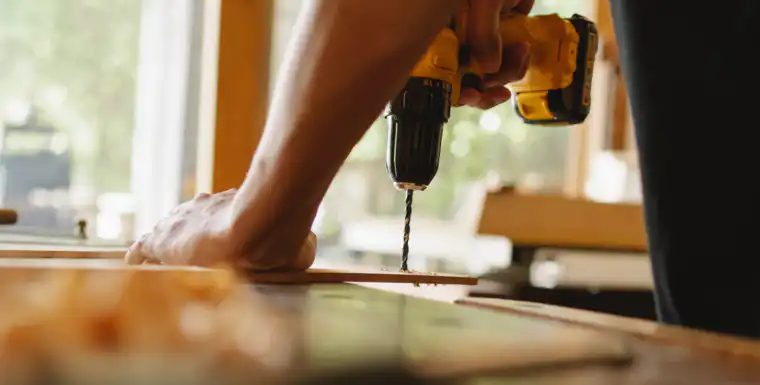
Gather Materials and Tools Needed
The first step is to gather all the necessary materials and tools. Having everything at hand not only saves time but prevents the frustration of halting work mid-way to hunt down a missing tool or material. Here's a more comprehensive list of what you might need:
- Sanding Paper or Block: To smooth out the surfaces before painting or staining.
- Primer: A good quality primer to prepare the wood for paint or stain.
- Paint or Stain: Choose a high-quality paint or stain for a durable finish.
- Veneer or Laminate Sheets: These will be used to reface the flat panel doors.
- Quality Brush or Spray Gun: A tool for evenly applying paint or stain.
- New Hardware: Knobs and pulls that complement the new look of your cabinets.
Tip: Opt for tools and materials that are user-friendly and suit your skill level. For instance, choose a paint that doesn't require a separate primer to save time and effort.
Choose Your Desired Finishes and Colors
Next, immerse yourself in the vibrant world of colors and textures as you select the finishes for your cabinets. Picture the hues that would breathe life into the space, creating a backdrop that inspires culinary creativity. Perhaps a splash of bold color to invigorate the space or a subtle shade to bring in tranquility? The canvas is yours to paint!
Measure Doors, Drawer Fronts, Panels, Etc., to Ensure Accurate Ordering
In the world of DIY, precision is your best friend. Accurate measurements not only facilitate a smooth installation process but also prevent costly errors. Employ a systematic approach as you measure each component, making sure to note down the numbers carefully. Remember, it's always better to measure twice and order once!
Remove Hardware, Hinges, and Knobs
As you gear up to infuse new life into your cabinets, start by removing the old hardware, hinges, and knobs. This process is like stripping away the years, preparing your cabinets to don a fresh, new avatar. As you unscrew each piece, you're paving the way for a kitchen that's about to transform before your very eyes.
Preparation Work Before Installation

Embarking on a DIY project is nothing short of an adventure. It's a chance to unveil the hidden craftsman in you. As you roll up your sleeves to breathe new life into your kitchen cabinets, preparing the groundwork is your first mission. Here’s how to navigate this phase with finesse:
Sand Down Old Finishes and Smooth Surfaces
Before introducing the fresh and vibrant shades to your cabinets, it's imperative to start with a clean, smooth canvas. It's time to wave goodbye to the chipped paint and aged finishes. Here's a step-by-step guide to help you through the process:
- Equip yourself with safety glasses and a dust mask.
- Choose sandpaper with the right grit — start with medium and gradually move to finer grits.
- Always sand in the direction of the wood grain to avoid unwanted scratches and achieve a smooth finish.
- Once the sanding is complete, clear away the dust with a tack cloth to prepare for the new finish.
Repair Any Damages Before Applying New Finishes
Next, turn your attention to the nicks, scratches, and other minor damages that might be marring the beauty of your cabinets. Here's a handy table that outlines the various possible damages and the ways to rectify them:
| Damage Type | Repair Material | Procedure |
|---|---|---|
| Small Holes | Wood Filler | Fill and level the surface |
| Scratches | Wood Filler | Apply filler and sand smoothly |
| Dents | Wood Putty | Fill the dent and sand evenly |
Don't aim for absolute perfection; a few quirks here and there add a rustic charm and tell a story of their own.
With the surfaces prepped and primed, you’re now ready to bring your vision to life. The canvas is set to be adorned with colors and textures that resonate with your style and personality.
Applying New Finishes and Hardware
The heart of cabinet refacing lies in the application of new finishes and hardware. It’s a transformative phase where you can witness your kitchen metamorphosing into a modern and inviting space. Let’s venture deeper into this fascinating stage:
Stain/Paint Existing Cabinet Boxes and Frames
Choosing to paint or stain your cabinets is a critical decision in your kitchen makeover. Each option comes with its set of advantages. While paint offers a clean and contemporary look, staining allows the natural wood grain to shine through. Whichever you choose, here's how to proceed:
- Begin with a layer of primer to ensure an even and lasting finish.
- Opt for oil-based paints for durability or water-based paints for a quicker drying time and easy cleanup.
- Apply the paint or stain using a brush for control or a spray gun for a smoother finish.
- Allow sufficient time for drying before moving to the next step, avoiding any mishaps or uneven results.
Attach New Veneer or Laminate Sheets onto Flat Panel Doors
Adding new veneer or laminate sheets to flat panel doors is akin to gifting them a fresh lease on life. Here, we present a set of considerations and steps to successfully navigate this part of the project:
| Aspect | Considerations |
|---|---|
| Material Selection | Choose veneers or laminates that enhance the aesthetics of your new color scheme |
| Application Process | Apply steadily from one end to avoid air bubbles and ensure a smooth finish |
| Finishing Touches | Trim excess material and smooth edges for a neat look |
Replace Worn Out or Broken Hardware with Matching Ones
As the finale approaches, it's time to adorn your cabinets with new, matching hardware. This part of the process is like adding sparkling jewelry to a beautiful outfit, enhancing its charm manifold. A blend of style and functionality should guide your choices, keeping consistency in mind to achieve a cohesive look. Install your selected knobs or pulls with precision, perhaps adding a touch of personal flair with unique designs that make a statement.
As you step back to admire your work, the metamorphosis of your kitchen will be nearly complete. Stay tuned for the final touches that will bring cohesion and a dash of flair to your newly refaced kitchen cabinets in the next section, making your kitchen a true epitome of beauty and functionality.
Reinstall Doors, Drawers, Knobs, And Pulls
Finally, the moment you have been tirelessly working towards is almost here. It’s time to see the new face of your kitchen as you reinstall the doors, drawers, knobs, and pulls. This phase is somewhat akin to watching a black and white movie gradually fill with vibrant colors, where every component you reinstall brings more life and vibrancy back into your kitchen space. Let's explore how to conduct this stage with precision:
The reinstallation process is like putting together pieces of a puzzle, with each piece having its designated spot. It might feel overwhelming looking at the disassembled parts, but fret not. Here's a strategic approach to go about it:
- Begin with the Drawers: Since drawers are easier to maneuver compared to cabinet doors, start by reinstalling them first. This step will give you a head-start and gradually ease you into the process.
- Move on to the Doors: Next, carefully attach the doors in their respective frames. Use a level to ensure they hang straight.
- Hardware Installation: Follow up by installing knobs and pulls. If you've opted for new designs, this is when you'll see your cabinets taking on a new personality.
- Final Adjustments: Once everything is in place, make necessary adjustments to ensure everything aligns properly and the doors and drawers open smoothly.
Remember, this isn't a race. Take your time to ensure each element is installed precisely, promising you a finish that you can be proud of.
Final Touches to Complete the Look
As you step into the final phase of your DIY kitchen cabinet refacing project, the excitement builds up. This is where your kitchen not only regains its functionality but also flaunts a fresh, modern appearance adorned with your personal touch. Let’s delve into the nuanced additions that bring a harmonious blend of beauty and functionality to your kitchen:
Add Decorative Moldings or Trim Pieces for Extra Flair
Adding decorative moldings or trim pieces can significantly elevate the look of your newly refaced cabinets, acting as the proverbial cherry on top. It's like adorning your cabinets with a tiara, lending a sophisticated charm and architectural depth that gracefully augments the entire look of your kitchen.
When choosing the right moldings or trim, consider a style that complements the design of your cabinets, creating a cohesive look that's pleasing to the eye. Select durable materials that harmonize well with your cabinet finishes, ensuring a seamless blend that epitomizes grace and elegance. And, when it comes to installation, meticulousness is key. A precise installation process guarantees a seamless and professional appearance that promises appreciative glances from every visitor.
Update Countertops and Backsplash Tiles for Cohesion
To ensure your kitchen looks cohesive and pulled together, consider updating the countertops and backsplash tiles. This update acts like the background in a painting, bringing all the elements together in a harmonious picture. Here are a few tips to ensure you select the right elements:
- Material Match: Choose materials that complement your newly refaced cabinets, creating a seamless flow in the kitchen's design.
- Color Coordination: Opt for colors that either contrast beautifully or match harmoniously with your cabinet colors, creating a balanced and pleasing look.
- Texture Play: Play with textures to add an extra dimension to your kitchen. A smooth cabinet finish paired with a textured backsplash can create a visually stimulating effect.
As you step back to appreciate the transformed space, breathe in the freshness, the vibrant energy that now pulsates through your kitchen. It's a space that tells a story - a story of hard work, creativity, and the joy of crafting something with your own two hands.
Achieving Satisfaction With DIY Cabinet Refacing
As we wrap up this comprehensive guide, you now stand at the threshold of a kitchen that mirrors a part of you. It's not just a space of culinary creations but also a canvas that showcases your craftsmanship and style.
What are the main takeaways from this rewarding project?
- Cost-Effective Transformation: Cabinet refacing is a budget-friendly yet impactful way to revamp your kitchen.
- Personal Touch: Adding personal touches through color choices, hardware, and decorative elements infuses the space with your unique personality.
- Rewarding Experience: The joy of witnessing the transformation of a space through your efforts is an unparalleled feeling of accomplishment.
So, what's stopping you from embarking on this exciting DIY project? Your refreshed, vibrant, and welcoming kitchen awaits!
Frequently Asked Questions
What are the benefits of DIY cabinet refacing?
DIY cabinet refacing is an economical and environmentally friendly way to give your kitchen a fresh new look. Not only does it save time compared to a full kitchen remodel, but it also allows you the freedom to infuse your personal style into the project. Additionally, by retaining the existing cabinet structures, you are contributing to waste reduction, making it a greener choice.
What materials and tools are essential for cabinet refacing?
For a successful cabinet refacing project, you'll need specific materials and tools. The materials include veneer or laminate sheets, paint or stain, new hardware, and optionally, decorative moldings or trims. The essential tools you would require are safety glasses, paintbrushes or a spray gun, sandpaper, a screwdriver, and a level. Having the right tools and materials at hand will ensure a smooth workflow and a professional finish.
Can I choose different finishes and colors when refacing cabinets?
Absolutely! Cabinet refacing allows you to explore a variety of finishes and colors to suit your aesthetic preferences. Whether you desire a bold splash of color to invigorate the space or a subtle hue to bring tranquility, the choices are plentiful. It's your opportunity to create a cohesive, modern, and refreshing look for your kitchen, aligning perfectly with your current tastes and home décor.